Getting Started with UIMenuController in iOS 5
November 9, 2011
When Apple added cut/copy/paste support in iOS 3.0, it also provided developers the ability
to customize the popover menu via UIMenuController. Unfortunately, that initial
implementation required non-trivial preparations by developers just to change the menu:
- The view attached to the menu must return
YESforcanBecomeFirstResponder, which meant it had to be subclassed. For example, two of the most popular display elements,UITableViewCellandUILabel, returnNOby default. UILongPressGestureRecognizerwas not available until iOS 3.2, which means that the long press to initiate the menu display had to be implemented viatouchesBegan:withEvent:,touchesMoved:withEvent:, andtouchesEnded:withEvent:. Every custom long press recognizer might use a different delay constant, which could easily confuse users who are used to another app's implementation.
Later iOS releases have streamlined this situation into two basic approaches, one for table cells and one for custom menu options. The sample code for this post can be found on GitHub.
Special Case: UITableViewCell on iOS 5
If you only need to use the system-provided options of cut, copy, or paste for a
UITableViewCell (by far the most common use), Apple has included a great
shortcut in iOS 5.0. All it takes is for you to implement three new
UITableViewDelegate methods to tell the OS which options you want to use and
what selectors to call when each is chosen. Here is an example that shows the copy button:
- (BOOL)tableView:(UITableView *)tableView shouldShowMenuForRowAtIndexPath:(NSIndexPath *)indexPath {
	return YES;
}

- (BOOL)tableView:(UITableView *)tableView canPerformAction:(SEL)action forRowAtIndexPath:(NSIndexPath *)indexPath withSender:(id)sender {
	if (action == @selector(copy:)) {
		return YES;
	}

	return NO;
}

- (void)tableView:(UITableView *)tableView performAction:(SEL)action forRowAtIndexPath:(NSIndexPath *)indexPath withSender:(id)sender {
	if (action == @selector(copy:)) {
		[UIPasteboard generalPasteboard].string = [data objectAtIndex:indexPath.row];
	}
}
The menu calls tableView:canPerformAction:forRowAtIndexPath:withSender to
determine if it should show each system menu option and calls
tableView:performAction:forRowAtIndexPath:withSender: when the user selects an
option. This functionality should cover the vast majority of use cases, but it only works
with system-provided actions.
Custom Menu Items
The code is a little more involved if you want to use custom menu options, but offers a lot
of flexibility. It's your responsibility to detect the long press and show the custom menu,
and the easiest way to do this is using UILongPressGestureRecognizer on the table
cell:
UILongPressGestureRecognizer *recognizer = [[UILongPressGestureRecognizer alloc] initWithTarget:self action:@selector(longPress:)];
[cell addGestureRecognizer:recognizer];
For the menu to appear, the target view must be in the responder chain. Many UIKit views
can't become a responder by default, so you may need to subclass them to return YES
for canBecomeFirstResponder.
In the example below, we use the custom class
TSTableViewCell and then implement the long press selector on the view controller:
- (void)longPress:(UILongPressGestureRecognizer *)recognizer {
if (recognizer.state == UIGestureRecognizerStateBegan) {
TSTableViewCell *cell = (TSTableViewCell *)recognizer.view;
[cell becomeFirstResponder];
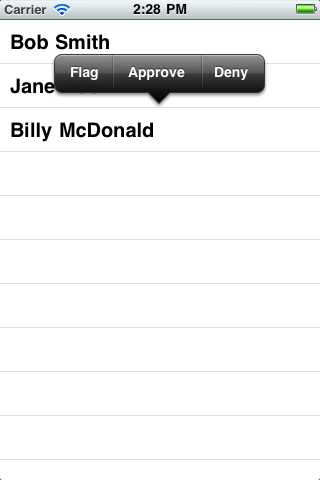
UIMenuItem *flag = [[UIMenuItem alloc] initWithTitle:@"Flag" action:@selector(flag:)];
UIMenuItem *approve = [[UIMenuItem alloc] initWithTitle:@"Approve" action:@selector(approve:)];
UIMenuItem *deny = [[UIMenuItem alloc] initWithTitle:@"Deny" action:@selector(deny:)];
UIMenuController *menu = [UIMenuController sharedMenuController];
[menu setMenuItems:[NSArray arrayWithObjects:flag, approve, deny, nil]];
[menu setTargetRect:cell.frame inView:cell.superview];
[menu setMenuVisible:YES animated:YES];
}
}
- (void)flag:(id)sender {
NSLog(@"Cell was flagged");
}
- (void)approve:(id)sender {
NSLog(@"Cell was approved");
}
- (void)deny:(id)sender {
NSLog(@"Cell was denied");
}
There is only one small gotcha with UIMenuItem: if the specified action is not
implemented by your view controller, that item will not appear in the menu.